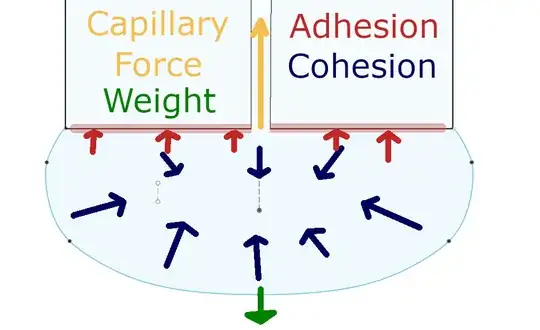
What you encounter there is a combination of Adhesion, Cohesion, and Capillary Force.
Cohesion is what holds the water together. Adhesion is the force to retain water against a wall or hanging from a pen's end, it is proportional to the surface wetted. Capillary Force is the resulting effect where water moves up through a thin tube, it is anti-proportional to the diameter and in the opposite direction of the weight (force). Their relation can be shown in this picture, where a droplet hangs on the end of a glass rod, which has a capillary in it:
How to reduce the water sticking in the cup then?
- Make the straight part of the bore as short as possible. This can be done by having a thin cup. The shorter the hole, the less surface there is the water can adhere to vertically, and you might overcome capillary force.
- Smooth the hole. Maybe print it 3.5 mm and drill it up to your 4 mm diameter. This reduces adhesion.
- Smooth the inside surface. Reducing the adhesion to the inside by having less steps.
- Chamfer the inside of the holes. This alters the whole geometry and flow setup in the very low water level case, especially when the surface separates into several areas, above each hole. Then the larger volume belonging to each hole on the inner side means there is a little more pressure and you can get out some more water - and it also shortens the distance the hole has to bridge.
- make sure there is some slope everywhere inside so that the water will collect in one of the holes.
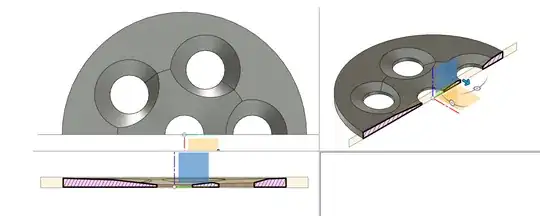
An example for a (non measured) design which relies heavily on chamfering to guide the water to the already chamfered holes and then keeps the straight section as short as possible could look like this: the central hole has a very wide chamfer, the whole plate directs water to the center and each of the other holes has a chamfer to guide out water.
However, there is a lower limit to where just tweaking the design will workd, which is based on cohesion. Cohesion is what results in surface tension and viscosity. You can only shift those limiting factors by altering the properties of the liquid, for example by adding an agent that lowers the surface tension and viscosity (soap).

